How to Fix Cracks in Your Concrete Patio
- Ace Concrete Contractors Austin
- Concrete Contractor Tips
Ace Concrete Contractors Austin

Cracks in your patio are frustrating, but most are fixable without replacing the entire slab. The key is matching the repair method to the crack type and addressing it before water infiltration worsens it.
Here’s how Austin homeowners can tackle patio crack repairs, from hairline fractures to larger structural issues that need professional attention.
Understanding why cracks form helps you prevent future problems and choose the right repair approach for your situation.
 Common Causes in Central Texas:
Clay Soil Movement Our Blackland Prairie soil expands significantly when wet and shrinks when dry, creating constant stress on concrete throughout the year. This cyclical movement is the primary cause of concrete damage in residential buildings in the Austin area. The soil can expand by 10% or more with changes in moisture, exerting tremendous pressure on your patio slab.
Tree Roots Mature oaks, pecans, and cedar elms push up from below, lifting and cracking concrete over time. Austin’s protected tree ordinances mean many patios coexist with aggressive root systems that weren’t anticipated during original construction.
Settling Ground shifts over time, especially in newer construction, where fill soil hasn’t fully compacted. Areas that were excavated and backfilled during construction often settle unevenly for years afterward.
Freeze-Thaw Cycles While less severe than northern climates, Austin’s occasional winter freezes expand trapped water in small cracks. Each freeze event slightly enlarges existing cracks, accelerating deterioration.
Original Installation Issues Insufficient thickness, poor soil preparation, inadequate curing, or missing control joints cause premature cracking. Concrete poured too thin or over poorly compacted soil develops problems much sooner than properly installed work.
Most patio cracks are cosmetic rather than structural. However, ignoring them allows water to penetrate beneath the slab, exacerbating the underlying issue and accelerating the damage cycle.
Different cracks require different repair approaches. Identifying what you’re dealing with helps you choose the right method:
Hairline Cracks (Under 1/8 inch) Surface-level fractures that don’t extend through the slab. These are primarily cosmetic and the easiest to fix. They typically result from normal shrinkage during curing or minor surface stress.
Medium Cracks (1/8 to 1/2 inch) Deeper cracks that may indicate settling or ongoing stress. Repairable with proper technique, but you should monitor for continued movement after repair. If they reopen within a few months, an underlying issue needs to be addressed.
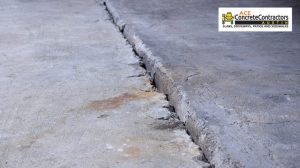
Wide Cracks (Over 1/2 inch) Significant separation suggesting structural issues or major soil movement. These cracks often extend through the full slab depth and may have vertical displacement between the two sides. Professional evaluation is recommended before attempting repair.
Pattern Cracking Multiple cracks forming a web or map pattern indicate systemic problems rather than isolated stress points. This typically results from improper curing, an overly wet concrete mix, or underlying soil failure.
Heaved or Sunken Sections When one section sits higher or lower than adjacent areas, the crack is a symptom rather than the core problem. The cause (roots, settling, drainage) needs to be addressed before surface repair makes sense.
For cracks under 1/4 inch, a DIY repair is straightforward and typically lasts several years:
Tools and Materials:
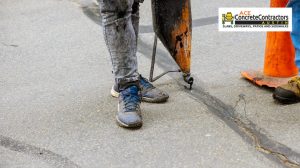
Step 1: Clean the Crack Thoroughly Remove all loose debris with a wire brush, working along the entire crack length. Vacuum out dust and small particles. The crack must be completely clean and dry for filler to bond properly. Any contamination prevents adhesion and causes premature failure.
Step 2: Apply Crack Filler Use a self-leveling concrete crack filler designed for horizontal surfaces. Squeeze filler into the crack, slightly overfilling to account for settling. The product will self-level and settle into the crack. Work in sections if the crack is long, completing each section before moving on.
Step 3: Smooth the Surface For thicker fillers that don’t self-level, use a putty knife to smooth level with the surrounding surface. Work quickly before the product begins setting. Feather the edges to blend with the existing concrete.
Step 4: Allow Proper Cure Time Most fillers cure enough for light foot traffic in 24-48 hours. Avoid walking on repairs during this time. Full strength typically develops within a week. Check product directions for specific timing.
Wider cracks (1/4 to 1/2 inch) need a different approach using patching compound rather than liquid filler:
Materials:
Step 1: Prepare the Crack Clean thoroughly with a wire brush and vacuum. For cracks deeper than 1/2 inch, insert backer rod (foam rope) to within 1/4 inch of the surface. This provides a base for the patch, saves material, and prevents three-sided adhesion that causes failure.
Step 2: Apply Bonding Agent Brush concrete bonding adhesive onto the crack walls, following product directions. This critical step helps the patching compound adhere to the existing concrete. Don’t skip it, as dry concrete doesn’t bond well to new material without help.
Step 3: Fill with Patching Compound Pack the compound firmly into the crack, pressing out air pockets. Work in layers for deep cracks, allowing each layer to set partially before adding more. Overfill slightly to allow for shrinkage during curing.
Step 4: Smooth and Texture Smooth with a trowel, feathering edges to blend with the surrounding concrete. Before the patch sets completely, texture the surface to match your patio. A damp brush or broom creates texture. Smooth finishes can be steel-troweled. Work quickly as the patching compound sets faster than regular concrete.
Some situations require professional evaluation before attempting repair:
Call a pro if you see:
At Ace Concrete Contractors, we assess whether repair or replacement makes more sense for your situation. Sometimes targeted repairs can significantly extend patio life at a modest cost. Other times, underlying issues make replacement the better long-term investment. We help you understand the tradeoffs.
Professional repair options include epoxy injection for structural cracks, slab lifting (mudjacking or foam injection) for settled sections, and partial slab replacement for localized damage.
After repairing existing cracks, take steps to prevent new ones from forming:
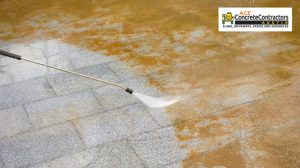
Seal Your Patio: Apply a quality concrete sealer every 2-3 years. Sealing prevents water penetration, the primary cause of crack expansion and freeze-thaw damage. Use a sealer rated for UV exposure, as Austin’s intense sun degrades some products quickly. Penetrating sealers perform better than film-forming sealers on patios that receive direct sunlight.
Manage Drainage: Ensure water flows away from your patio rather than pooling on or around it. Adjust sprinkler heads that spray onto concrete edges. Clean gutters that overflow onto patio surfaces. Grade the surrounding soil to direct runoff away from the slab.
Control Tree Roots: If trees are causing problems, consult a certified arborist about root management options. Root barriers can sometimes redirect growth away from concrete without harming the tree. For severe cases, professional root pruning may be necessary.
Address Problems Early: Small cracks are easy and inexpensive to fix. Waiting allows water infiltration, root intrusion, and continued movement, making repairs more complex and expensive. Inspect your patio annually and address new cracks promptly.
Repairs often look different from the surrounding concrete. Here are options for better blending:
Tinting the Patch Mix concrete colorant into the patching compound before applying. Test on cardboard first since colors lighten significantly as the concrete cures.
Whole-Patio Staining Apply concrete stain to the entire patio after repairs cure (wait 28+ days). This creates uniform color across original and repaired areas.
Consider Overlay For patios with extensive repairs, a concrete overlay provides a fresh surface over existing concrete without full replacement.
New patches lighten as they cure, while original concrete darkens with age. Perfect color matching is difficult even for professionals, but a sealed patio with a consistent sheen minimizes contrast.
Not sure whether your patio needs repair or replacement? Call Ace Concrete Contractors at (512) 566-7530 for a free assessment. We evaluate the cracks, identify underlying causes, and recommend the most cost-effective solution for your situation.
We’ve been serving Austin homeowners since 2012 with patios, driveways, sidewalks, and all types of concrete work. We’re fully insured and stand behind our work. Contact us to schedule your estimate.